
How to record your creative process + video equipment
We all love a good process video, and if you are thinking about what tools you need, then you are in the right place. You can also read more about why you should video record your process here.
In this blog post I'll give you all the details on what I use to record and edit my videos, but if you want to read more about the importance of recording and sharing your video process you can read this.
To know more about how I take pictures of my artworks you can click here.
Some good tips before we get into equipment.
1. Light is important for both your pictures and your videos. Do few tests to see how your videos will render because lighting is extremely important, you don't want dark videos where everything is confusing.
2. If you are recording for your social media, be sure not to waste screen time for not relevant content. The main focus is your artwork, so go straight to that, no need for introductions.
3. Show progress and satisfying moments. If in 2 minutes of videos not much change is visible, consider speeding that up and focus on more interesting bits.
In general, always keep in mind that people want to see change happening, and you need to grab their attention quickly.
4. Your artwork + your progress are the focus of the video, so the only things you'd need to show on camera are your artwork and the tools to work on it. Declutter and move irrelevant stuff.
Now, I know that most people want to record their videos and they think they need to have the perfect set up to do it. As you'll see from the pictures below, nothing needs to be perfect or the right camera.
Just start, and see what works for you. If you have a phone with a decent camera... then it's all you need.
Just to let you know... the first time I recorded an overhead video I piled up a bunch of books left and right of my artwork and placed a long ruler at the top of the books, then placed my phone on the ruler.
So really, whatever you have will work.
I record all my videos with an iPhone.
No really need to specify what model I own because even before I was using ... my previous iPhone and the one before that.
I'm not one that buys the latest new phone, but I got a phone with a good camera, because I know I take a lot of pictures and record a lot of videos. So if you have one of those, whatever brand, it will do the job.
One thing I find very important is to leave my phone always plugged in while you record your video.
And if you are someone that gets a lot of texts/calls, you can set your phone on "do not disturb" mode.
Why do I use my phone and not a professional camera?
Glad you asked.
I use my phone because:
- I always have it with me,
- it's less bulky than a camera,
- I don't need to move files,
- and very important for me, I can do all my video editing on my phone without having to transfer files.
I do a lot of my video editing while waiting for things... if I'm in a queue somewhere, if I'm waiting for the dishwasher ahaha that sort of stuff, and the fact everything is stored on my phone makes it 100 times easier rather than having to turn on my computer.
I do have a decent (wouldn't really call it professional) digital camera, that I use only to take high resolution pictures of the final artwork, and that's quite handy for printing or for archiving.
All the artworks you can see on my Redbubble shop are photographed with the digital camera because the resolution is much better than my iPhone.
If you plan to do a lot of printing, I recommend getting a good digital camera (or a scanner), you don't have to spend a fortune, but the quality is waaaay better than your phone!
When you're setting up your phone, or your camera, to record your process, make sure you have a bit extra space on camera than just the size of your artwork.
For example: if you are painting on a A4 size artwork, make sure your recording includes all the space around it as well.
Unless you work on something really heavy that won't move, you're quite likely to change position or rotate your artwork while you work on it.
Watch the video below knowing that the artwork measures 40x50cm / 16x20in and my desk is very wide but only 60cm / 24in deep.
While I work on the artwork it moves around a lot, and if I had set up my camera to cover only the size of the paper I would have missed plenty of action.
So, if you can, record more space around your artwork, and then you can crop it out if you don't need it.
On my phone I use the following apps:
Camera for normal recording & for time-lapse videos
InShot app for video editing
Normal Video recording for anything I know I might need in the future at a normal speed (courses or "how to" videos).
Time-lapse mode only for videos I know nobody will enjoy at normal speed.
For example, this below was more than 35 hours of work.
As much as you might enjoy watching me drawing lines, I'd be surprised if you wanted to see all the 35 hours of recording :)
The above was a long process, it took me about a month to work on the full artwork, and I put the video together with the InShot app.
The app offers a free plan as well as a premium one.
As I do a lot of video recording, I got the premium plan and it's super worth it.
Reasons why I like this app:
- It's very intuitive, even if you never done video editing before.
- You can add text and or stickers on your videos if you want to
- Offers a good control over the image and colour quality without being overly complicated
To be completely honest, you can find a bunch of apps out there that are very similar, but as video editing apps, this is solid and reliable.
For video editing for my course as I had to coordinate videos + audio and background music I used iMovie. Not going to go much in details here, I will write a blog post about the way I recorded and edited all the content of my course in another blog post.
All my videos are then backed-up on the Cloud. It's all synchronised on my phone, so I don't even have to think about it.
This also helps because I don't have to think about moving files with a USB. Everything is in one place and one only.
Then, Ideally you'd structure your Cloud in folders - I wish I had the time to do this, so my Cloud so far is a mess, one day I will do a bit of Spring Cleaning... one day...
Video Recording Set Up

I use a white plastic table cloth, you can get them by the meter.
These type of table cloths are available in a lot of colours, I got mine in white so the artwork pops up in the camera.
It's really handy because I don't throw anything away, I just clean it up after I'm done painting.
The only down side on having it white is that with time - as you can see a bit from the picture - it tends to yellow. But, I have had mine for more than 2 years now, and if you keep it clean and don't let colour dry up, it should work perfectly. Also, the colour you see up there is not what renders in the camera - see picture below.
On the left I have a studio light.
My studio is quite dark and I needed extra light - especially for winter time, so I got these ones from Amazon: ESDDI Softbox Photography Lighting Kit 20 x 28 inch with 800W and 5500K Soft Lights, Continuous Lighting for Portraits and Product Shooting with Carry Bag
In winter time, if I'm painting during the day I only use 1, if I'm painting at night I'd set the two of them up, one on the left and one on the right.
These lights are great and once folded don't take up much space.
I highly recommend these ones as the quality is really good and you can adjust the height based on your needs, however on Amazon there are tons of options at very different price points too.
I have used the 2 lights for evening workshops as well, and the quality on camera is good, not as good as natural light, but I was really happy with it.
You just have to place them in the right spots depending on the room/space you have.
If you live somewhere where the weather changes super quickly, like Ireland (gotta love the Irish weather!!), having a light on will reduce the changes of natural light coming through the window.
Now, I don't pay much attention to this anymore because I'm embracing the over changing weather, however, there are some of my videos where the light keeps changing because of clouds. In a time-lapse video this becomes quite visible, so if this annoys you, keep one of the studio lights on and that should reduce the problem.
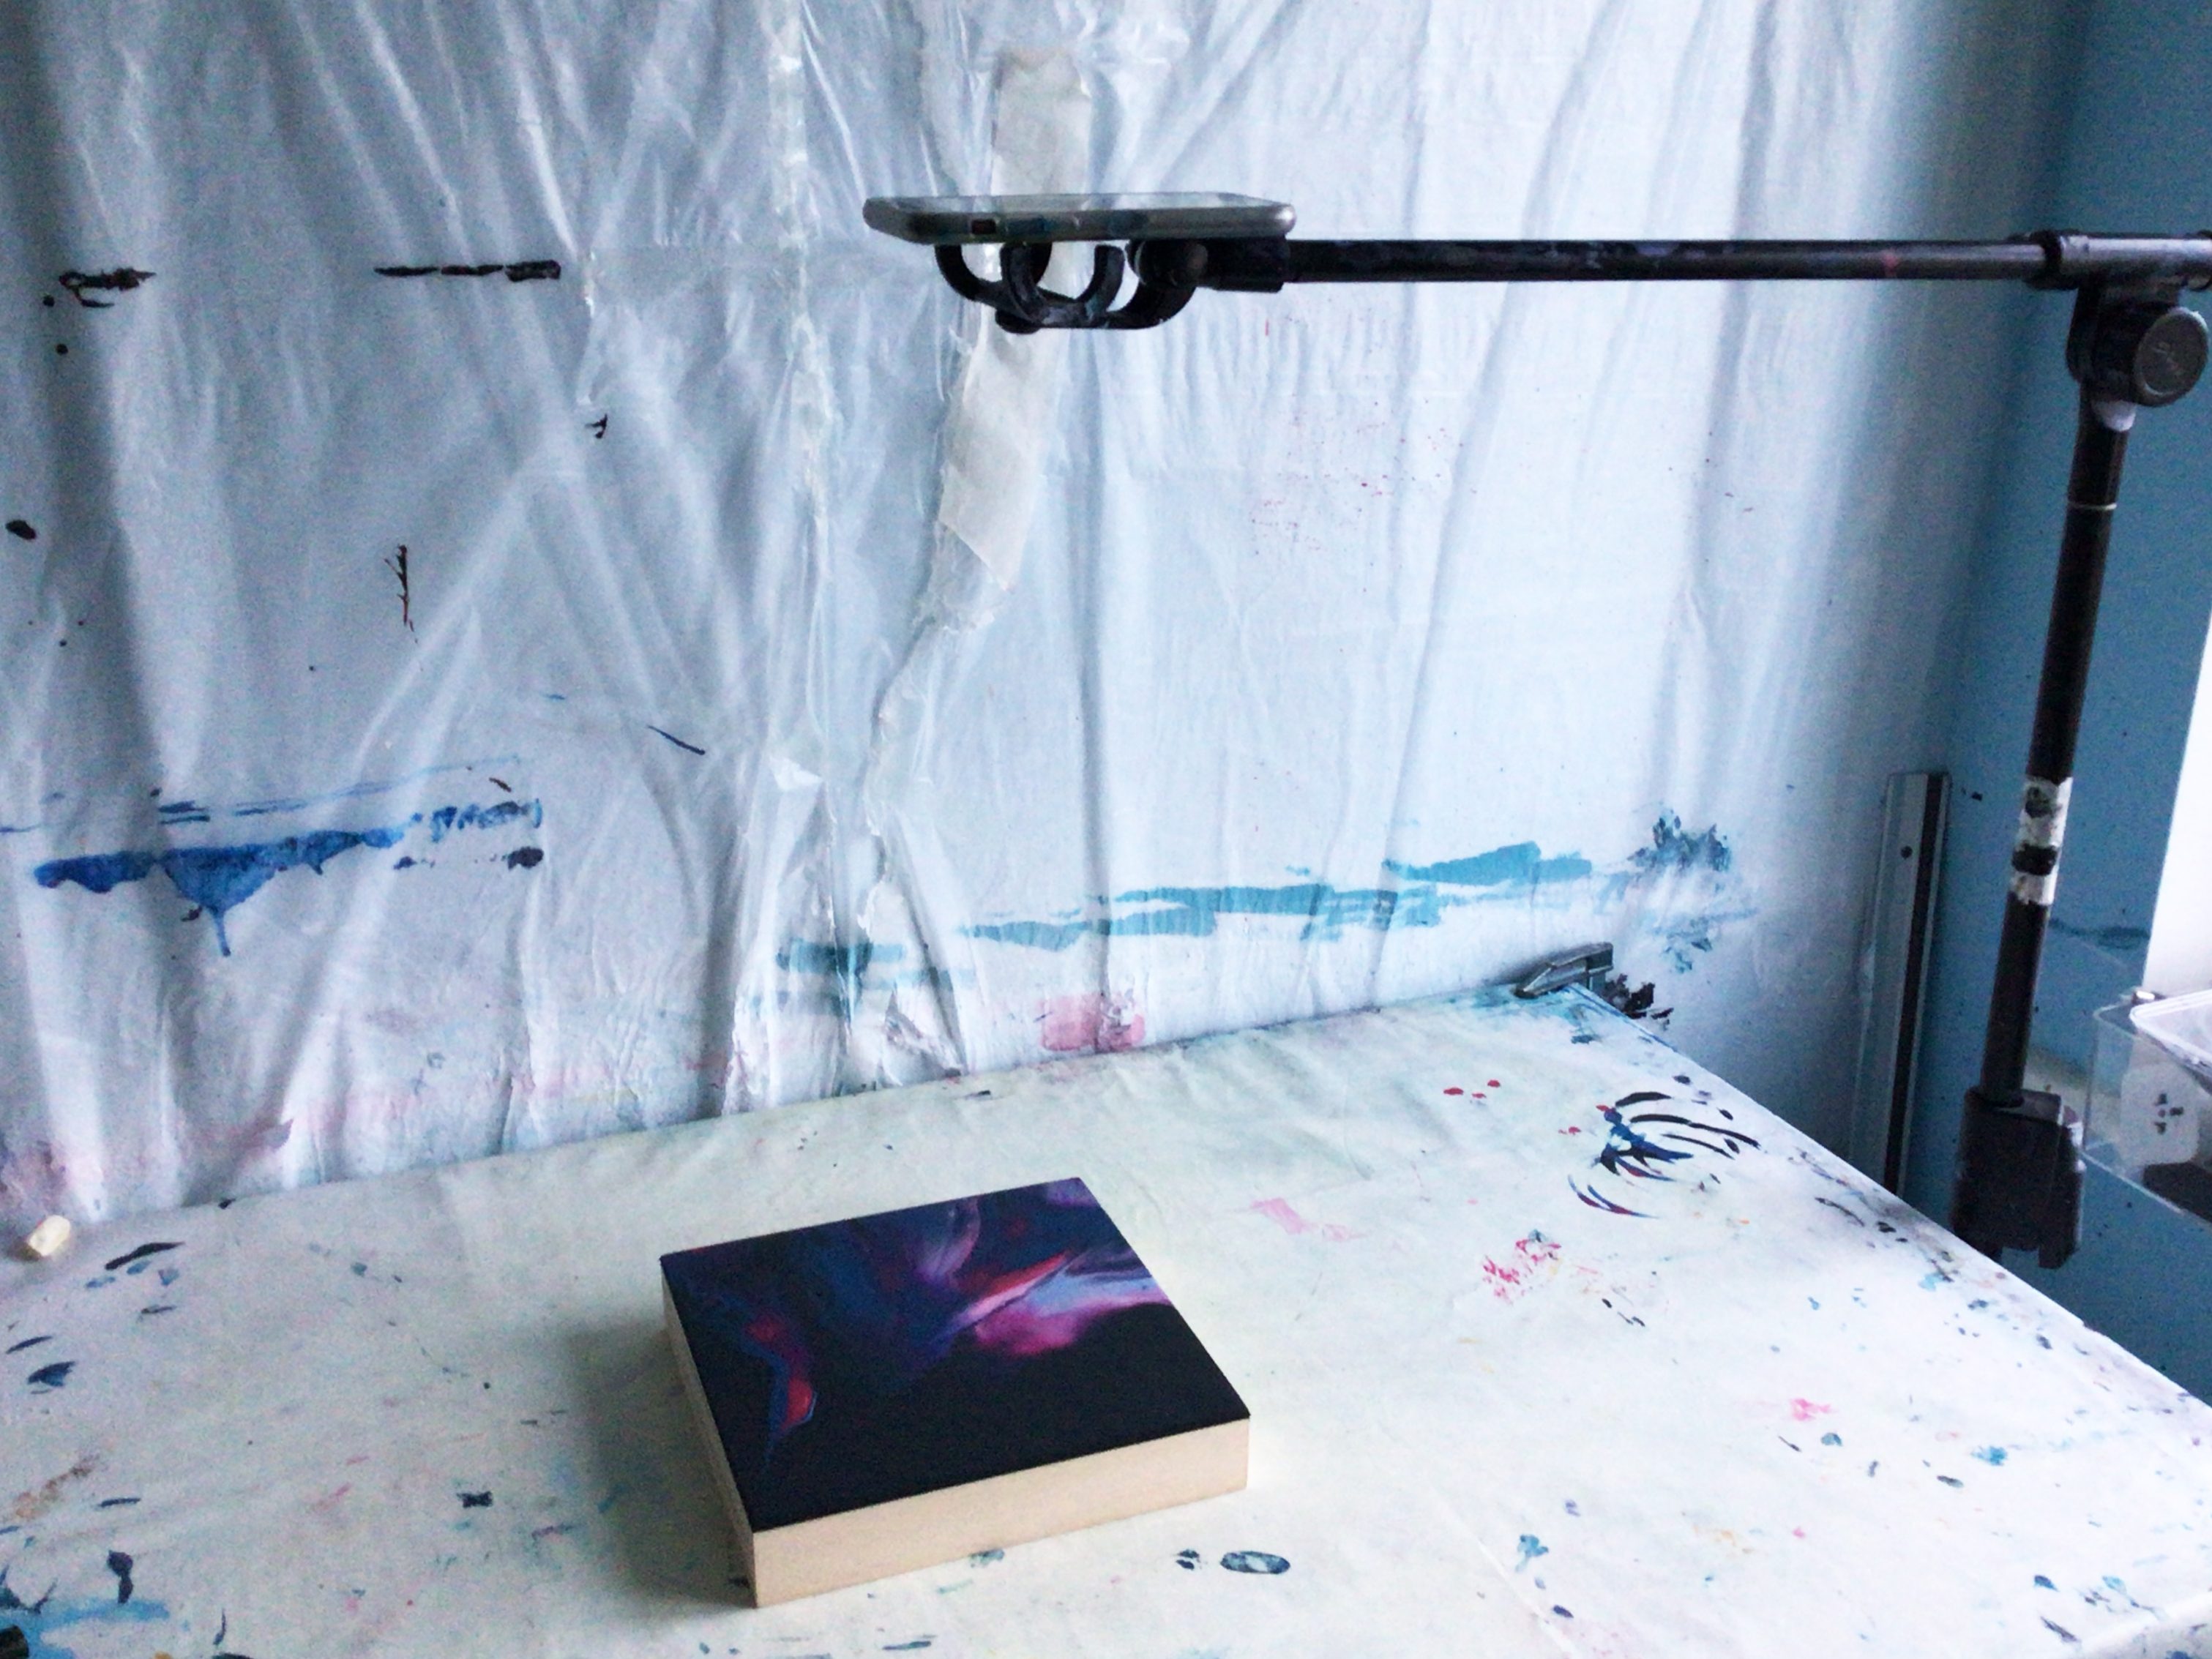
To hold my phone while I record a video I use an iPad stand.
I got this from Amazon: Lamicall Gooseneck Tablet Holder, Universal Tablet Stand
I got an iPad stand rather than a specific phone one because I can use my iPad too. So I have one stand that fits both.
NOTE: The stand itself is great, however, if you move a bit the table it will shake and it might be visible on camera, so I attach the stand to my studio stool and place it next to me (I do not sit while I paint) rather than securing it to the desk.
If you lightly touch the stand it will move, so secure it to something you are sure you're not going to touch.
The stand works perfectly if you want to record details of your work, because the arm isn't too long.
That's why I also have that ... thingy on the right :)
That thingy on the right is a microphone holder. This is a random bit of equipment that my husband had from his band. We hacked the top so it can hold my phone too.
I do not use it as a microphone holder, instead I use it to hold my phone.
The solution is far from perfect, however it works for my studio and for my recording needs.
Before you buy anything, think about how you want to record your videos.
Do you need to be on top of the artwork? or do you need to be on the side?
If you want to record from the top then I suggest getting one of these: Overhead Video Stand Phone Holder Articulating Arm
An overhead video stand allows you to record videos from the top as well as use it as a iPhone stand while you're painting a canvas against the wall.

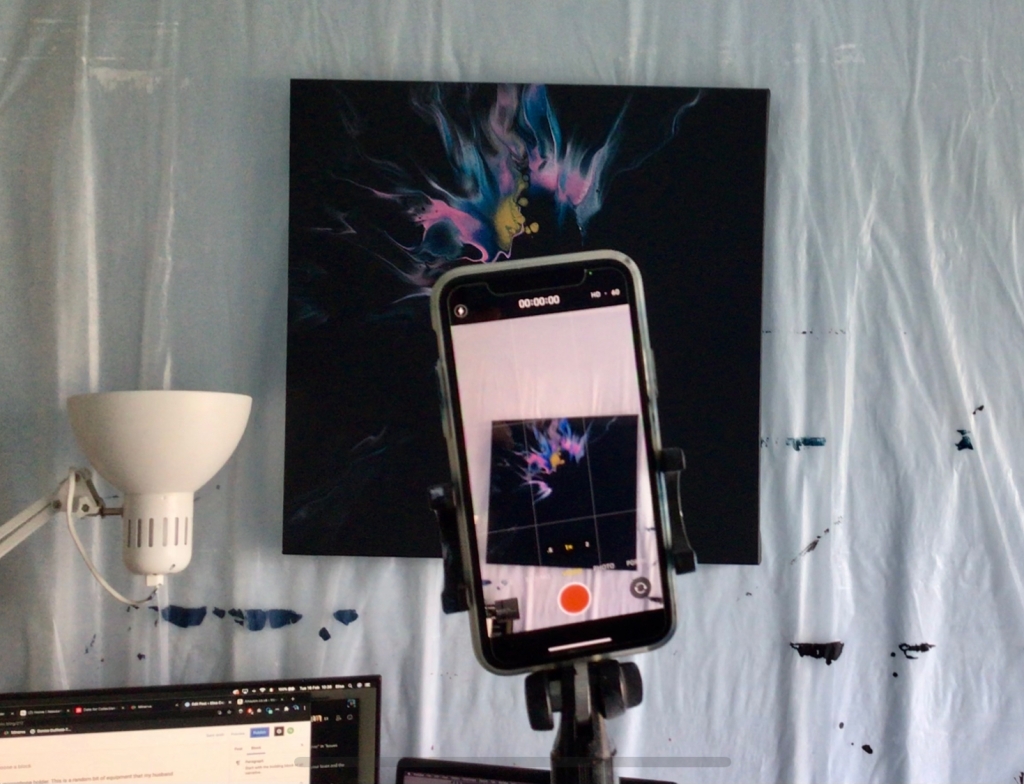
For overhead recording, I try to delete from my final video every time I cover the artwork with my head. Usually if that happens is to check details rather than painting.
But if you notice you tend to do it a lot, maybe overhead recording isn't for you.
Don't change the way you create to record your process, but instead, adjust your video recording to your very specific needs.
Few extra bits I have that might come handy in other situations:
A phone stand, I have this one. I find it quite handy for calls with clients. Because I move a bit more around the studio - if we are discussing sizes or different artworks, I can be close and still hold a canvas with both my hands, or more far away and don't have to worry about shaky hands.
A webcam with microphone.
I use this one for workshops so I can be connected on Zoom and welcome everyone during the introduction - you can see me and the studio and the tools I'm going to use. Then I can place it closer to the artwork to show you the details of the artwork.
It comes with a little tripod, and that's handy so you don't have to move your computer, but it's still connected to your computer with a USB cable, so make sure it's long enough :)
Video recording can be intimidating at first but as long as you have a phone, you are all set.
There is no reason to fear this process!
Written by Elisa Capitanio
Artist & Designer
♥️ Making a home & colourful abstract paintings
✨ Art for real homes & lived lives
